Create SCIM Microservices
Workflow Studio provides a .NET SCIM Microservice template for creating microservices that use the SCIM (System for Cross-domain Identity Management) protocol. SCIM enables standardized communication between EmpowerID and external systems for user provisioning, deprovisioning, and identity data synchronization.
What You'll Learn
This tutorial shows you how to:
- Create a SCIM microservice project in Workflow Studio
- Understand the generated project structure
- Implement custom logic for your target system
- Deploy the microservice to Azure
- Configure the SCIM account store in EmpowerID
- Verify and adjust resource system parameters
Prerequisites
Before creating SCIM microservices, ensure you have:
- Workflow Studio installed and configured
- Visual Studio installed
- An Azure subscription with an App Service created (or IIS environment prepared)
- Basic understanding of the SCIM protocol
- Knowledge of the target system's API you're integrating with
Create a SCIM Microservice
Step 1: Generate the Project
- Open Workflow Studio.
- Right-click the source control folder where you want to create the SCIM microservice.
- Select New Extension or Library > Azure Services (.NET 6.0).

Workflow Studio generates a stub for the new SCIM microservice.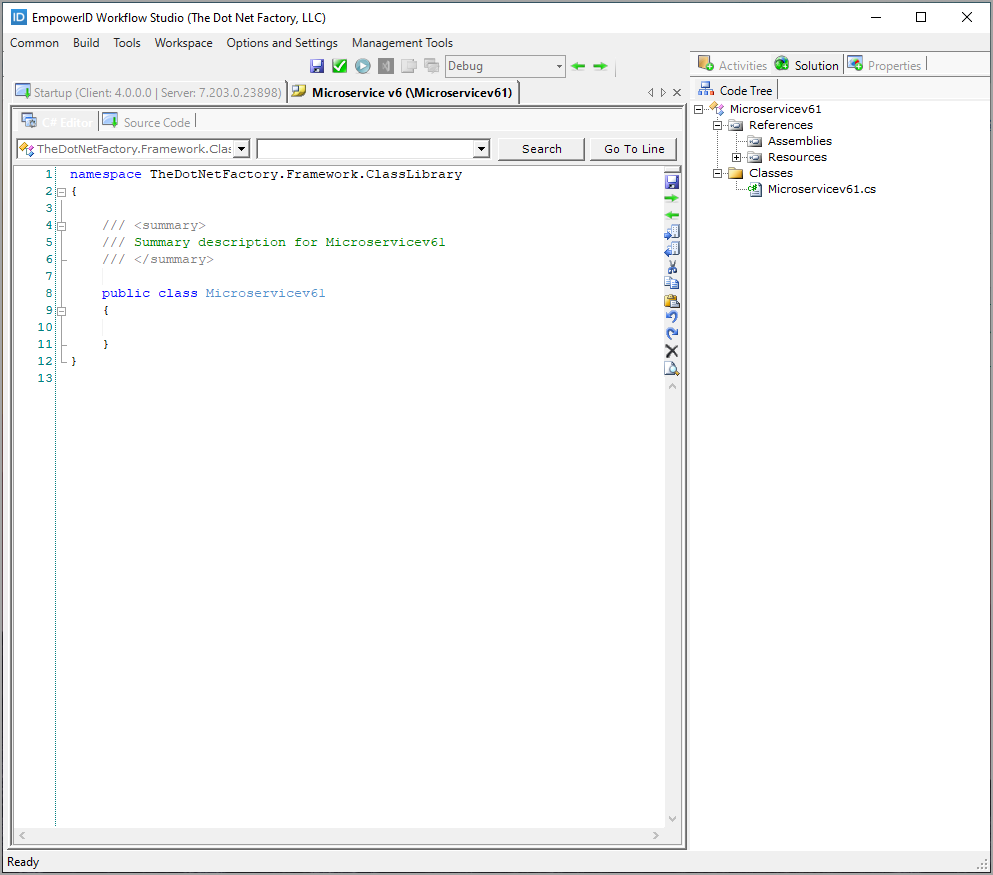
- Click the Properties tab.
- Select SCIM as the ServiceType.

- Click Save on the Workflow Studio toolbar.
- Name the microservice (e.g.,
MySystemSCIMService).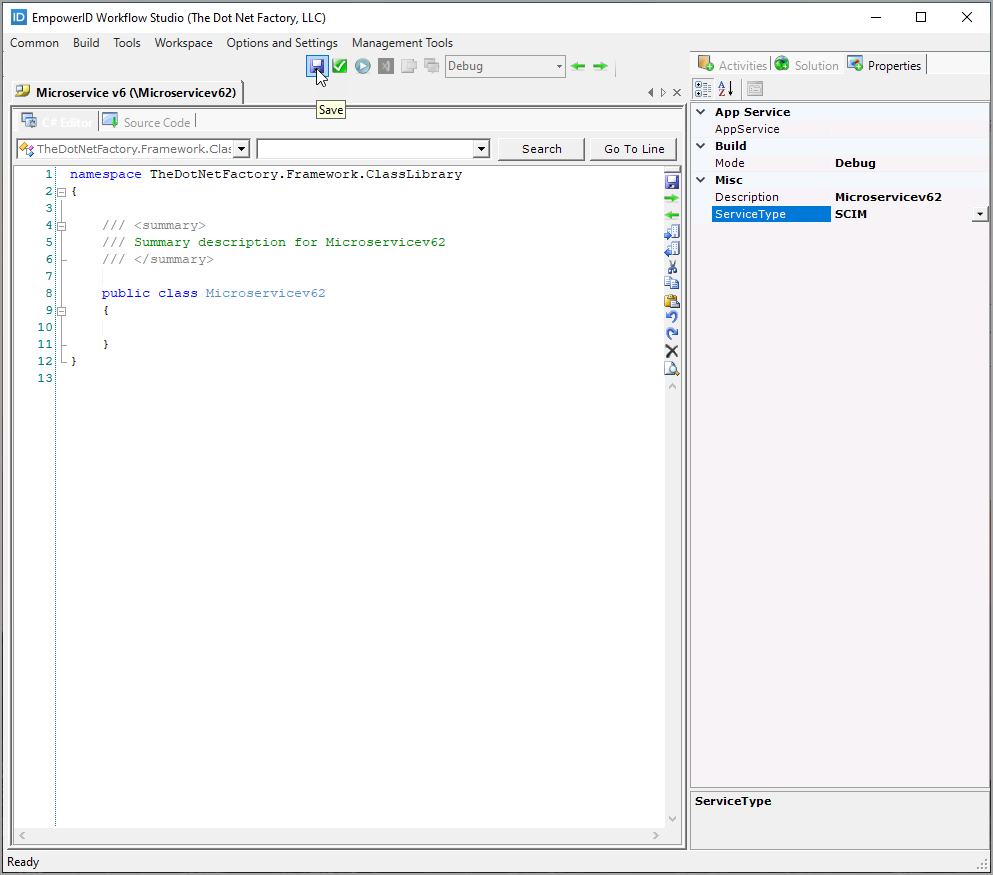
Step 2: Review Generated Structure
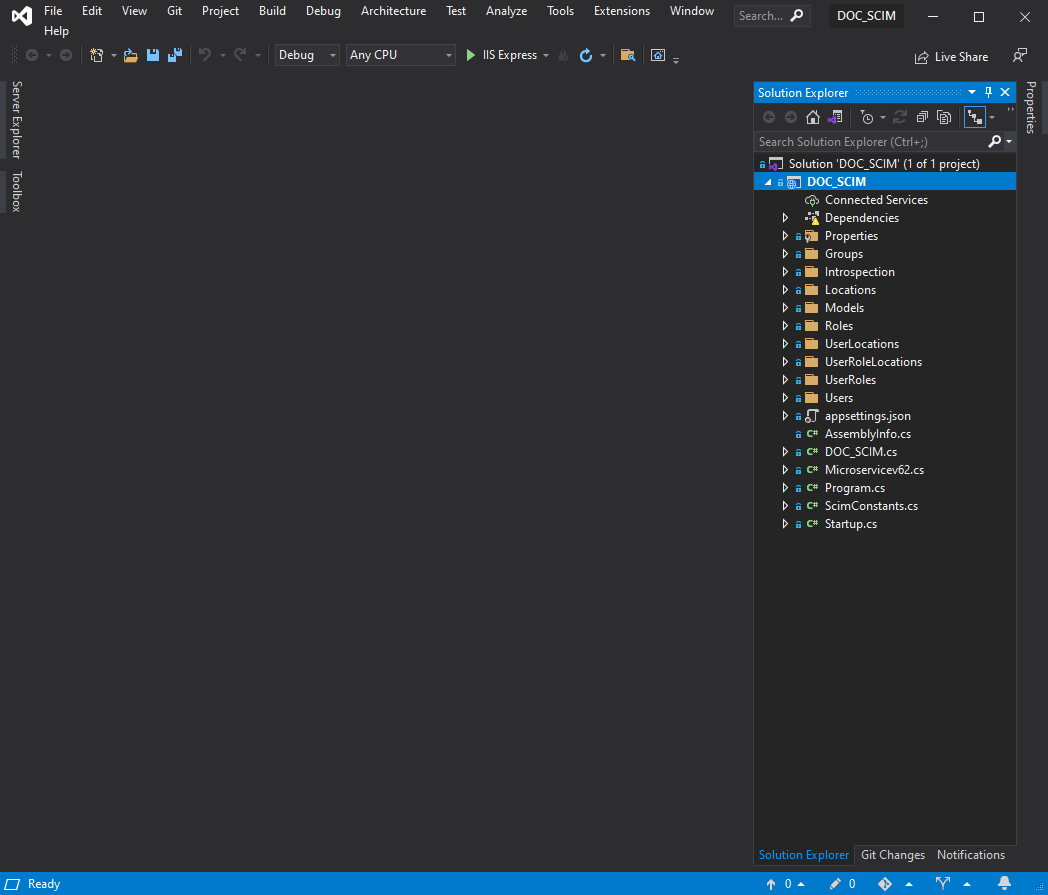
Expand the Code Tree to view the generated classes. The template creates a complete SCIM service structure with models, controllers, and repositories.

Understanding the Generated Classes
The SCIM template generates several classes organized by resource type. Each resource type includes a model, controller, and repository.
Models
Models define the data structures for SCIM resources:
| Class | Description |
|---|---|
User.cs | Model for SCIM user objects |
UserDataExtension.cs | Extends the user model with additional attributes |
Group.cs | Model for SCIM group objects |
GroupDataExtension.cs | Extends the group model with additional attributes |
Role.cs | Model for SCIM role objects |
Location.cs | Model for SCIM location objects |
UserLocation.cs | Model for user-location relationships |
UserRole.cs | Model for user-role relationships |
UserRoleLocation.cs | Model for role-location relationships |
Controllers
Controllers define the API endpoints for each resource type:
| Class | Description |
|---|---|
UsersController.cs | Endpoints for user operations |
GroupsController.cs | Endpoints for group operations |
RolesController.cs | Endpoints for role operations |
LocationsController.cs | Endpoints for location operations |
UserLocationsController.cs | Endpoints for user location operations |
Repositories
Repositories contain the implementation methods that interact with your target system. Each repository includes standard CRUD operations:
| Class | Description |
|---|---|
UsersRepository.cs | User data operations |
GroupsRepository.cs | Group data operations |
RolesRepository.cs | Role data operations |
LocationsRepository.cs | Location data operations |
UserLocationRepository.cs | User location data operations |
Standard Repository Methods:
Each repository implements these methods:
Create()- Create resources in the external systemQuery()- Query and return resource data from the external systemGet()- Return a single resource from the external systemUpdate()- Update a single resource in the external systemPatch()- Partially update a resourceDelete()- Delete a single resource from the external system
Implement Custom Logic
Step 1: Open in Visual Studio
- Close the Workflow Studio project.
- Locate the project in your source control folder.
- Double-click the project file to open it in Visual Studio.
Step 2: Implement Repository Methods
The generated repository classes contain method stubs. Implement these methods to interact with your target system's API. The specific implementation depends on your target system's requirements and API.
Each repository provides these methods that need implementation:
Create()- Create resources in the external systemQuery()- Query and return resource data from the external systemGet()- Return a single resource from the external systemUpdate()- Update a single resource in the external systemPatch()- Partially update a resourceDelete()- Delete a single resource from the external system
Step 3: Build the Solution
- In Visual Studio, click Build > Build Solution.
- Verify the build completes without errors.
- The build process creates a deployment zip file in the
_microservicesfolder:- Path:
..\\EmpowerID\\WFS\\_microservices - File:
{YourMicroserviceName}.zip
- Path:
Deploy to Azure
You can deploy SCIM microservices using either Workflow Studio's Cloud Explorer or PowerShell.
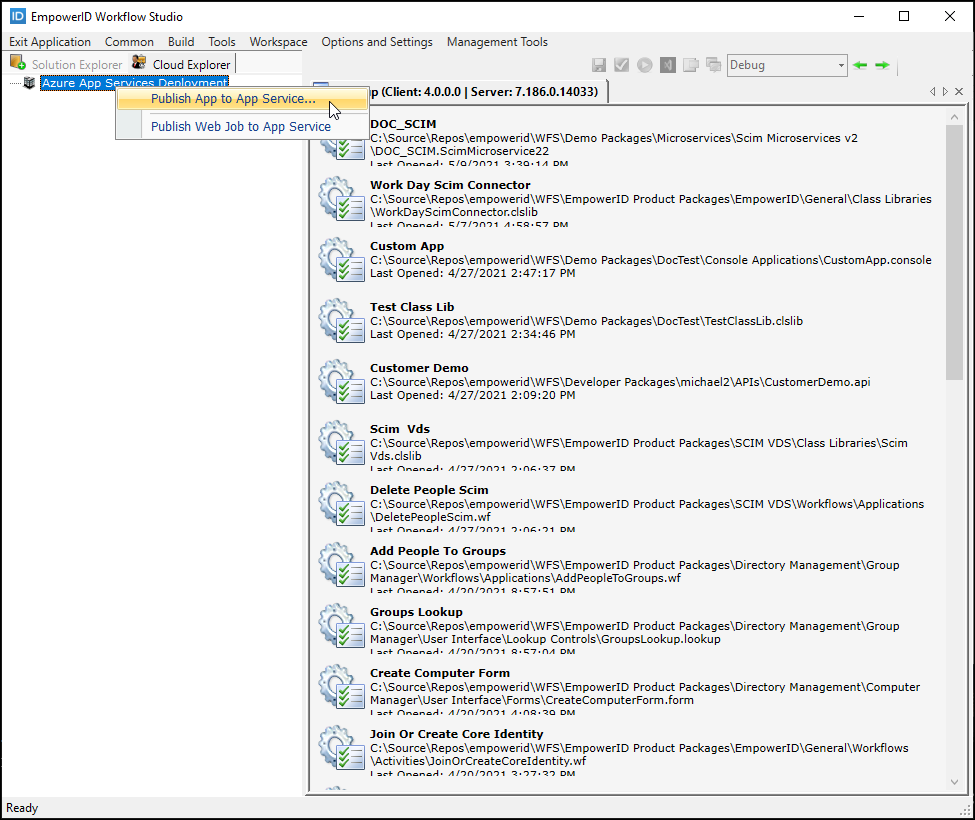
Option 1: Deploy via Workflow Studio
- In Workflow Studio, select Cloud Explorer.
- Right-click Azure App Services Deployment.
- Select Publish App to App Service.
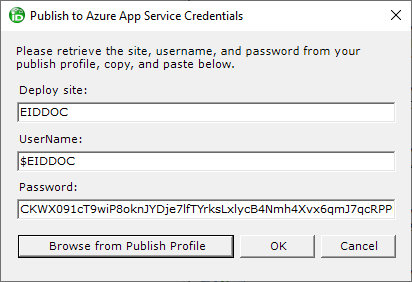
- Click Browse from Publish Profile.
- Select the
.PublishSettingsfile for your Azure App Service.- Download this file from the Azure Portal if you don't have it
- Download this file from the Azure Portal if you don't have it
- Click OK to populate the deployment credentials.
- Browse to and select the microservice zip file from the
_microservicesfolder. - Wait for deployment to complete.
- Click OK when the success message appears.

Option 2: Deploy via PowerShell
Use the PowerShell deployment script for automation. See Publish EmpowerID Microservice to Azure Using PowerShell for detailed instructions.
Create the SCIM Account Store
After deploying the microservice, create a SCIM account store in EmpowerID to connect to it.
Step 1: Create Account Store
- In the EmpowerID Web interface, navigate to Admin > Applications and Directories > Account Stores and Systems.
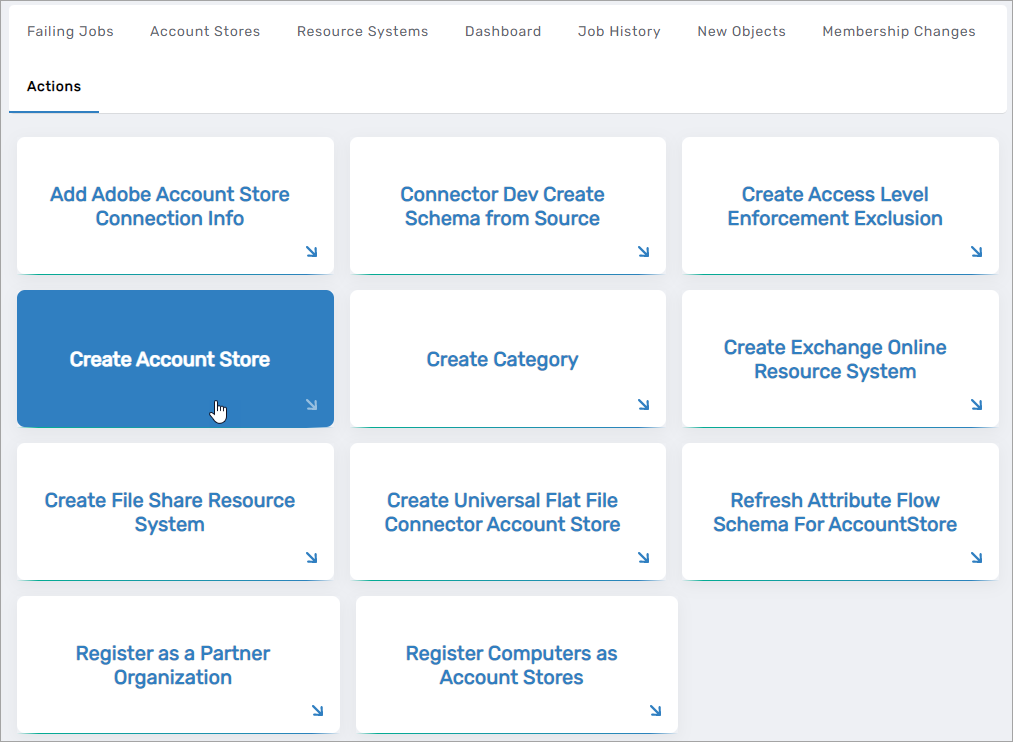
- Click the Actions tab.
- Click Create Account Store.
- In the System Types lookup, search for SCIM Connector.
- Select the SCIM Connector record.
- Click Submit.

This opens the SCIM connector form.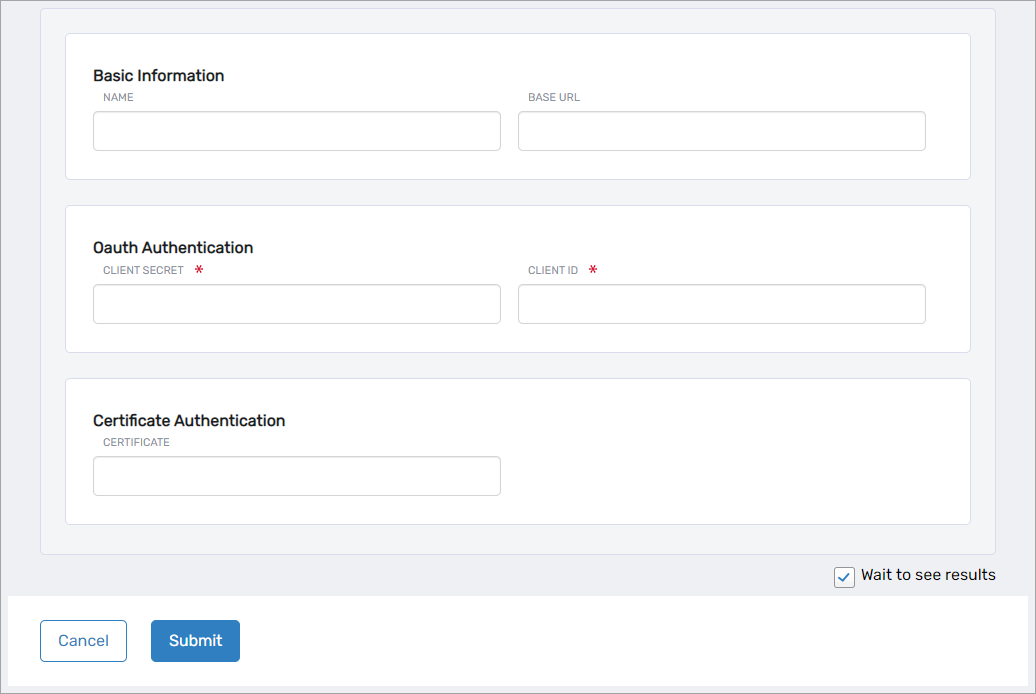
Step 2: Configure Connection
In the SCIM connector form, enter:
Basic Settings:
- Name - Descriptive name for the connector (e.g., "Production HR System")
- Base URL - URL where the microservice is hosted
- Azure App Service example:
https://your-app-service.azurewebsites.net - On-premises example:
https://your-server.company.com/scim
- Azure App Service example:
Authentication (choose one method):
For OAuth authentication:
- Client ID - OAuth Client ID for the application
- Client Secret - OAuth Client Secret for the application
For certificate-based authentication:
- Certificate - Thumbprint of the authentication certificate
Click Submit to create the account store.
Verify Resource System Parameters
After creating the account store, verify the configuration parameters match your deployment.
Step 1: Access Resource System
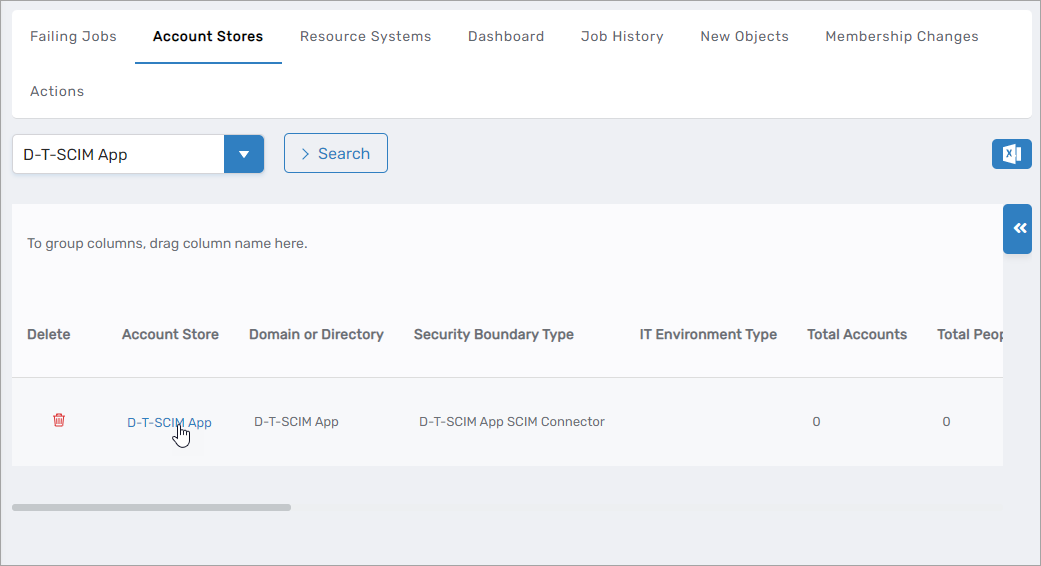
- Navigate to Admin > Applications and Directories > Account Stores and Systems.
- Search for the SCIM account store you created.
- Click the Account Store link.
- Click the Resource System tab.
- Expand the Configuration Parameters accordion.
Step 2: Review Parameters
Verify these parameters match your microservice endpoints:
| Parameter | Expected Value | Description |
|---|---|---|
ServiceURl | Your Base SCIM URL | Base endpoint for the microservice |
AccessTokenUrl | {Base URL}/oauth/v2/token | OAuth token endpoint (if using OAuth) |
AuthorizationUrl | {Base URL}/oauth/v2/authorize | OAuth authorization endpoint (if using OAuth) |
certificateThumprint | Certificate thumbprint | Authentication certificate (if using certificates) |
ClientKey | OAuth Client Key | OAuth client key (if using OAuth) |
ClientSecret | OAuth Client Secret | OAuth client secret (encrypted, not visible) |
CreateUserUrl | {Base URL}/users | Endpoint for creating users |
QueryUsersUrl | {Base URL}/users | Endpoint for querying users |
GetDeleteorUpdateUserByIdURL | {Base URL}/users/{0} | Endpoint for user operations by ID |
QueryGroupsUrl | {Base URL}/groups | Endpoint for querying groups |
GetDeleteorUpdateGroupByIdURL | {Base URL}/groups/{0} | Endpoint for group operations by ID |
GetGroupMemberURL | {Base URL}/groups/members | Endpoint for group membership |
QueryZonesUrl | {Base URL}/locations | Endpoint for querying locations |
EnableGroupInventory | true or false | Enable/disable group inventory |
EnableOrgZonesInventory | true or false | Enable/disable location inventory |
IsIncrementalInventory | true or false | Use incremental inventory after initial full inventory |
Step 3: Update Parameters
To modify a parameter:
- Click the Edit button for the parameter.
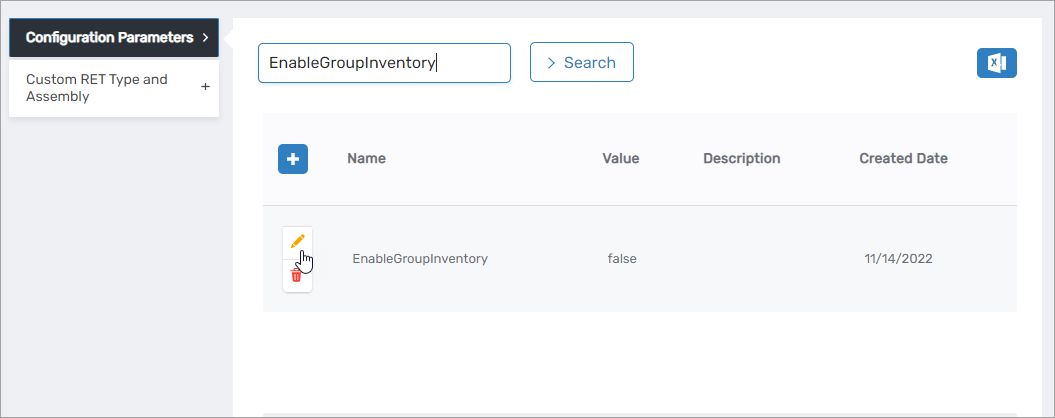
- Enter the correct value in the Value field.
- Click Save.
- Repeat for each parameter that needs updating.
Configure Account Store
Before running inventory, an administrator must configure additional account store settings:
Required Configuration:
- Attribute Flow - Map SCIM attributes to EmpowerID person/account attributes
- Account Store Settings - Configure inventory schedules and options
- Account Inbox Workflow - Enable the permanent workflow for processing new accounts