Create Approval Policies
Approval Policies define the approval routing and decision logic for access requests in EmpowerID. When users submit Business Requests through the IAM Shop or other workflows, these policies determine who must approve each request before access is granted. This article guides you through creating a new Approval Policy. To modify an existing policy, search for and open it, then proceed to the Configure Approval Steps section below.
Prerequisites
- Approval Steps must be created and published before they can be added to an Approval Policy
- Ensure you have administrative privileges to create and modify Approval Policies
- Recommended: Have your approval workflow mapped out before beginning configuration
Create the Policy
-
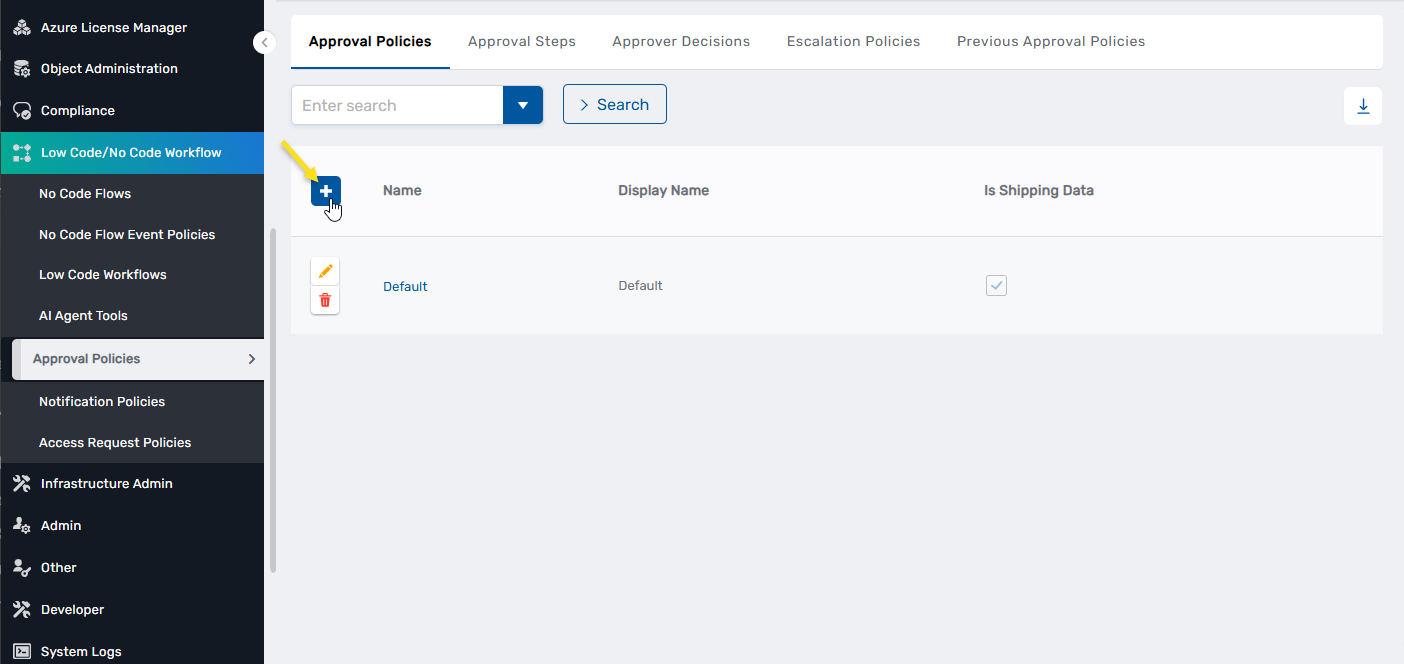
Navigate to Low Code/No Code Workflow > Approval Policies.
-
On the Approval Policies tab, click the Add button in the grid header.
-
In the Add New Policy dialog, fill out the fields as appropriate. Refer to the table below for field descriptions.
Field Required Description NAME Yes A unique internal name for the policy used for system identification. DISPLAY NAME Yes A user-friendly name displayed in the UI to help identify the policy. LOCALE KEY (UNIQUE NAME) No Unique identifier for translating the display name into multiple languages. DESCRIPTION No Explanatory text for the policy's purpose or context. LOCALE KEY FOR DESCRIPTION No Unique identifier for translating the description into multiple languages. Is Shipping Data No For internal use only. -
Click Save, then close the dialog.
-
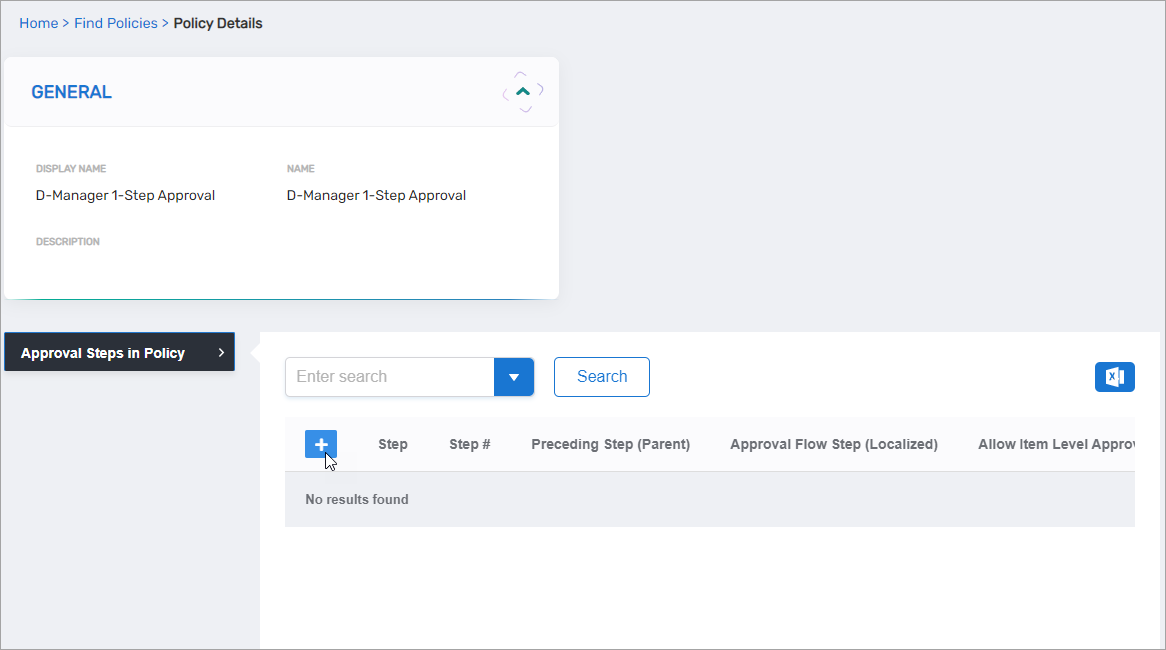
Search for the policy you just created and click the Name link to open it.
Configure Approval Steps
-
Expand the Approval Steps in Policy accordion and click the Add button.
-
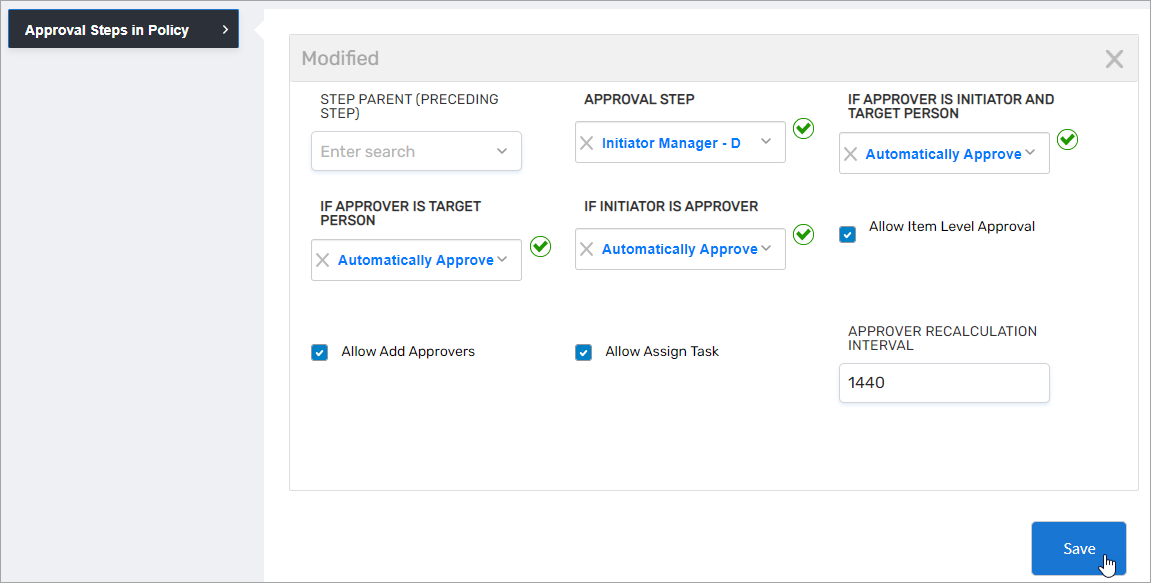
For Approval Step, select the approval step to use in this policy.
-
Configure the auto-approve conditions:
Condition Recommended Setting Purpose If Initiator Is Approver Automatically Approve Eliminates unnecessary approval clicks when the person submitting the request (e.g., a manager requesting access for their direct report) is also the designated approver. Select Remove from Approvers to exclude them while allowing other approvers to proceed. If Approver Is Target Person Remove from Approvers or Automatically Approve Prevents people from approving access changes to their own accounts. If Approver Is Initiator And Target Person Remove from Approvers Enforces strict Four-Eyes principle when someone requests access for themselves and is also the designated approver. -
Select Allow Item Level Approval to enable approvers to make decisions on individual items within a request.
-
(Optional) Select Allow Add Approvers to let approvers add additional reviewers to the task.
-
(Optional) Select Allow Assign Task to let approvers delegate the task to others.
-
Click Save.
-
(Optional) For multi-tiered approval processes, add additional steps:
- Click Add to create a second step
- Select your second approval step (e.g., Security Team Approval)
- For Parent Step, select the first approval step to ensure sequential execution
- Configure auto-approve settings as appropriate
- Click Save
- Repeat for additional steps as needed
Publish the Policy
Approval Policies are not active until published. Publishing creates a version snapshot that will be used for all new requests. In-flight approvals continue using the version that was active when they were submitted, allowing you to refine approval logic without disrupting active workflows.
- Click the Publish button on the policy view page.
- Confirm the publication when prompted.
Link to Resources
For the Approval Policy to be used when users request access to resources, it must be linked to an Access Request Policy. Access Request Policies govern resource requestability and determine which Approval Policy applies to specific resources.
Verification
To verify your Approval Policy is configured correctly:
- Navigate to Low Code/No Code Workflow > Approval Policies.
- Search for your newly created policy.
- Confirm that:
- At least one approval step has been added to the policy
- Each step has appropriate auto-approve settings configured
- The policy status shows as "Published"
- The policy is referenced in at least one Access Request Policy