Add OAuth Scopes to REST API Endpoints
OAuth scopes provide fine-grained access control for REST API endpoints by limiting what resources an application or user can access. When an application requests an access token, it specifies one or more scopes. Upon successful authentication, the Authorization server issues an access token limited to only the web services associated with those scopes, ensuring applications can only access the specific APIs they are authorized to use.
What You'll Learn
In this tutorial, you'll configure OAuth scope-based access control for REST API endpoints by:
- Creating custom REST API endpoints in Workflow Studio
- Setting up an OAuth client application with proper credentials
- Creating a Protected Application Resource and binding it to the OAuth client
- Defining OAuth scopes that group related API endpoints
- Mapping scopes to specific API endpoints
- Granting RBAC access to web services
- Testing OAuth scope implementation
Prerequisites
Before beginning this tutorial, you should have custom REST API endpoints created in Workflow Studio. For reference on creating REST API endpoints, see Create Custom REST API Endpoints.
OAuth Scopes in EmpowerID
There are three components involved with OAuth scopes in EmpowerID:
- Web Service – REST APIs created in Workflow Studio and published as protected app resources
- Application – Protected Application Resource of SSO Type OAuth
- OAuth client application – OAuth application which issues ClientID, Client Secret, and API Key
In EmpowerID, scopes are assigned on a Protected Application Resource level. A protected application must be bound to an OAuth client application. Custom OAuth scopes are defined, and appropriate web services are assigned to the scope. When an application or user requests an access token with defined scopes, the issued access token will be granted access to all the web services assigned to the requested scopes.
Step 1: Create Custom REST API Endpoints in Workflow Studio
Create custom API REST endpoints/web services for EmpowerID in Workflow Studio. The table below shows example endpoints. Replace these with your own endpoints based on your requirements.
| Endpoint Name | Endpoint Name |
|---|---|
EIDBot.ValidateOTP | EIDBot.Register |
EIDBot.Exists | EIDBot.GetRegisterInfo |
EIDBot.StartComputer | EIDBot.GetPersonFromCommunicationType |
EIDBot.StopComputer | EIDBot.GetMagicLoginForServiceProvider |
EIDBot.ComputerExists | EIDBot.RetrieveSecretL |
EIDBot.ChangePassword | EIDBot.RetrieveSecretC |
EIDBot.PushMessage | EIDBot.CheckOrgRoleID |
EIDBot.AdminUnlockUserURL | EIDBot.SearchServiceProviders |
EIDBot.CheckPrimaryOrgRoleOrgZoneID | EIDBot.ExternalCreds |
EIDBot.ShareSecret | EIDBot.CheckInCredsList |
EIDBot.CheckOutCred | EIDBot.GetSAPRoles |
EIDBot.TokenValid | EIDBot.AssignPersonToGroup |
Step 2: Create an OAuth Client Application
Create the OAuth Client Application
- On the navbar of the EmpowerID Web interface, expand Single Sign-On > SSO Connections and select OAuth /OpenID Connect.
- From the EmpowerID OAuth Client Apps tab of the OAuth page, click the Add button.

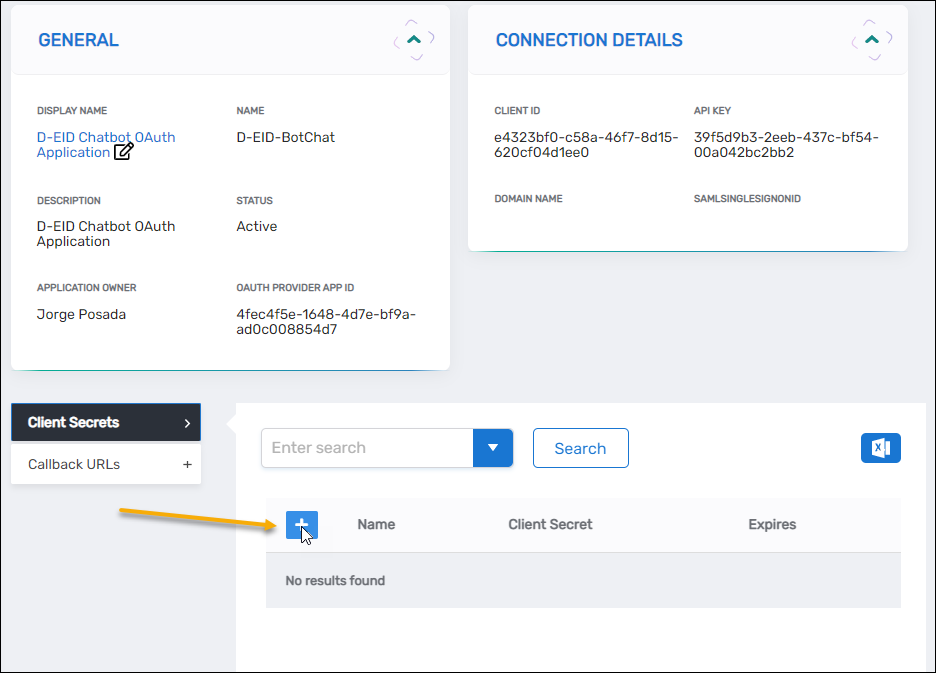
- Under the General tab of the OAuth Provider Application Details page, fill in the following:
- Name – Name of the application
- Display Name – Display name for the application
- Description – Description for the application
- Application Type – Select the appropriate application type from the drop-down
- Application Owner – Person creating the app by default; or, search for another person
- Issuer – Defaults to EmpowerID; you can update the value to any string/URL you want
- Signing Certificate – Select a certificate with a private key from the EmpowerID certificate store
- Click Save to create the application.
Add Client Secrets and Callback URLs
- After EmpowerID creates the application, expand the Client Secrets accordion and click the blue Add button in the grid header.
- Copy the string in the Client Secret field.
This is the only time you will see the entire string. Once you create the secret, the value is encrypted and you will not be able to recover it. Copy and save it in a secure location before proceeding.
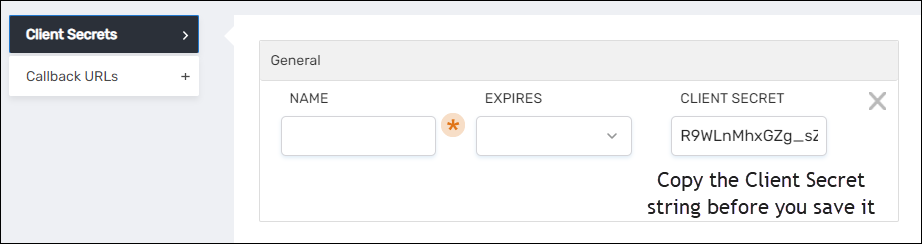
- After you have copied and saved the Client Secret, enter the following information:
- Name – Name of the secret
- Expires – Select I Year, 2 Years or Never
- Click Save to create the secret.
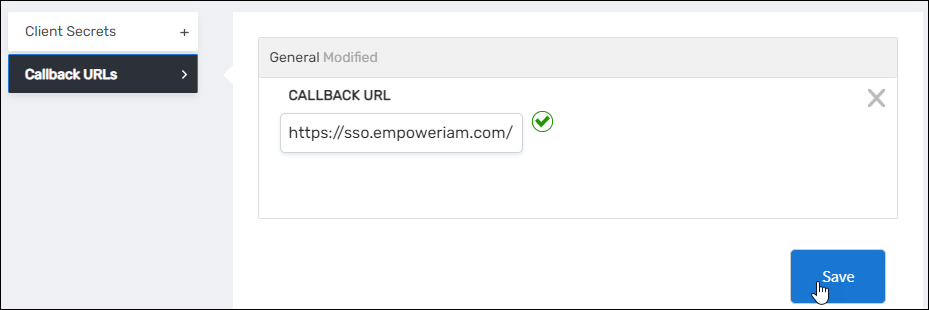
- Expand the Callback URLs accordion.
- Click the blue Add button in the Callback URLs accordion and then enter https://<yourserver>/WebIdPForms/OAuth/V2, replacing
<yourserver>with the FQDN of your EmpowerID Web server. Add any other Callback URLs supported by your application. Callback URLs are case-sensitive. - Click Save to close the dialog.
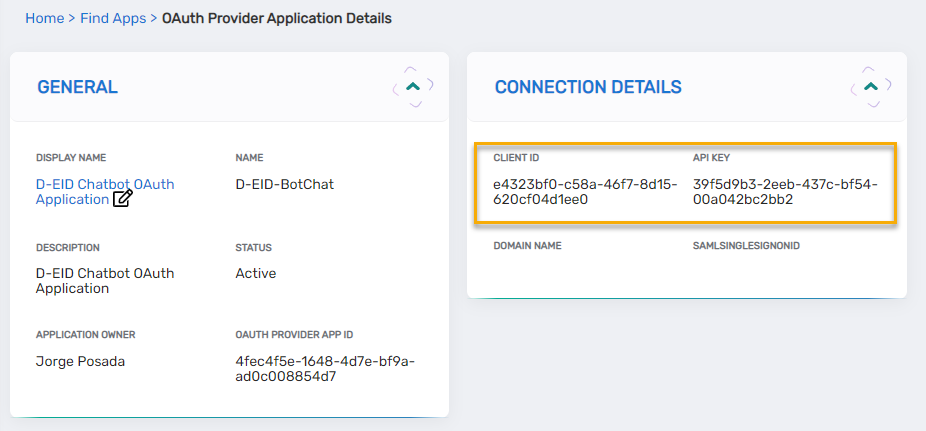
- Copy and save the Client ID and API Key values for later use.
Step 3: Create an SSO App for the Client App
Create the Protected Application Resource
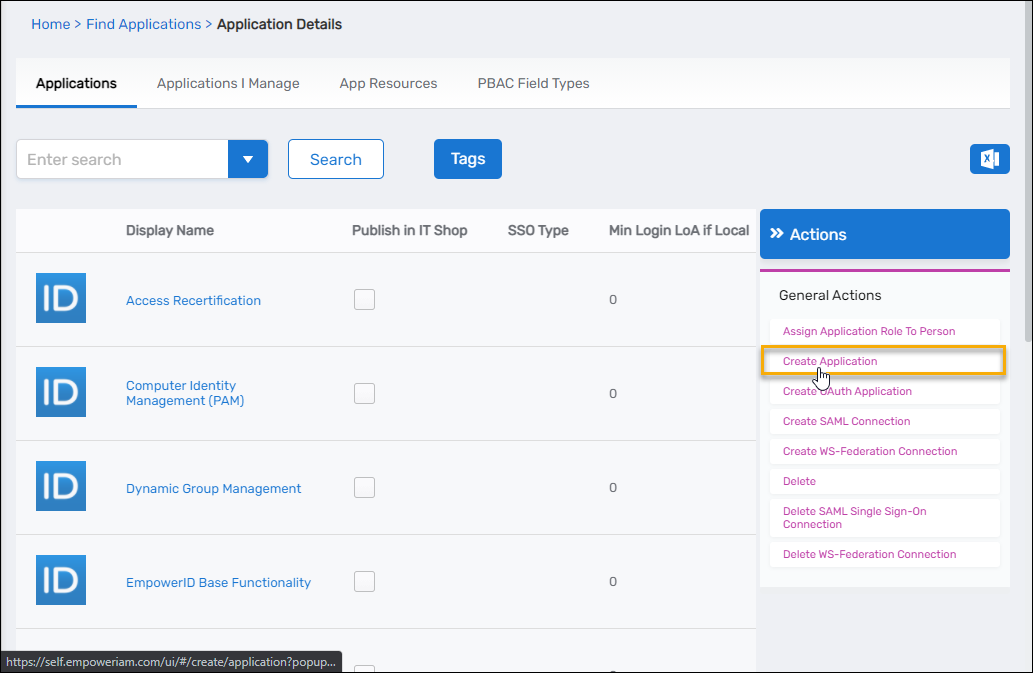
- On the navbar, under Apps and Authentication, select Applications.
- From the Actions pane, click Create Application.
- Under the General tab of the Application Details page, fill in the following:
- Name – Name of the application
- Display Name – Display name for the application
- Description – Description for the application
- Create a Tracking Only Account Store – Select this option to create an account store for the application
- Creation Location – Click the Select a Location link and then select and save the desired creation location for the application
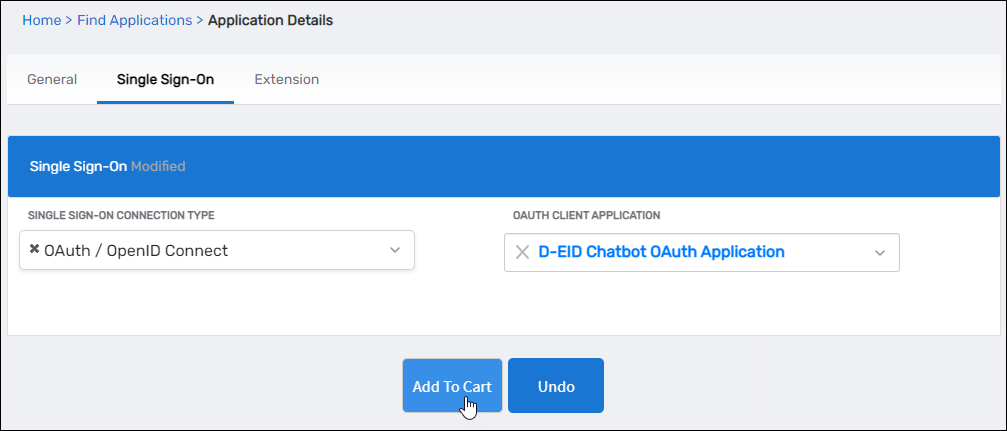
- Click the Single Sign-On tab of the Application Details page and do the following:
- Single Sign-On Connection Type – Select OAuth / OpenID Connect
- OAuth Client Application – Search for and select the OAuth Client application you created above
- Click Add to Cart
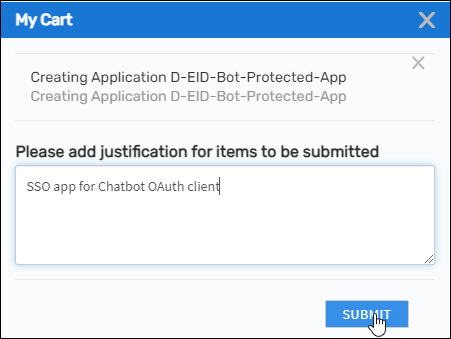
- Click the Cart icon at the top of the page to open the cart.
- Enter a reason for creating the application and then click Submit.
Step 4: Add OAuth Scopes
Configure OAuth Scopes
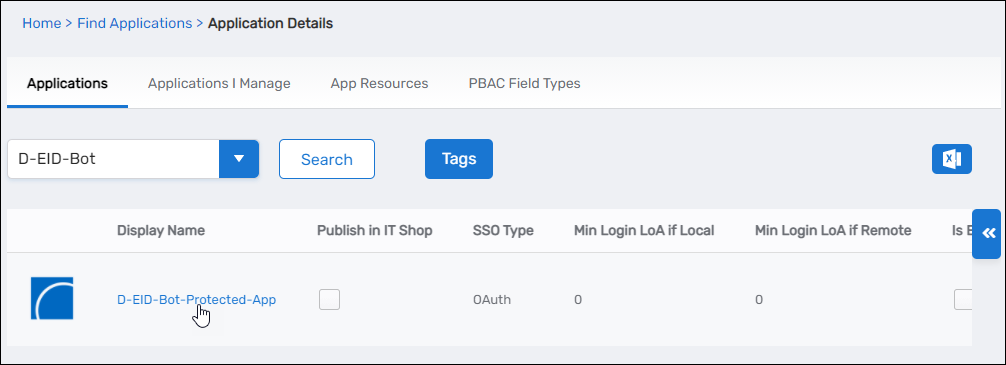
- Click the Find Applications breadcrumb on the Application Details page to return to the Find Applications page.
- Search for the application you just created and click the Display Name link for it.
- On the Application Details page that appears, select the SSO tab and expand the Scopes (OAuth) accordion.
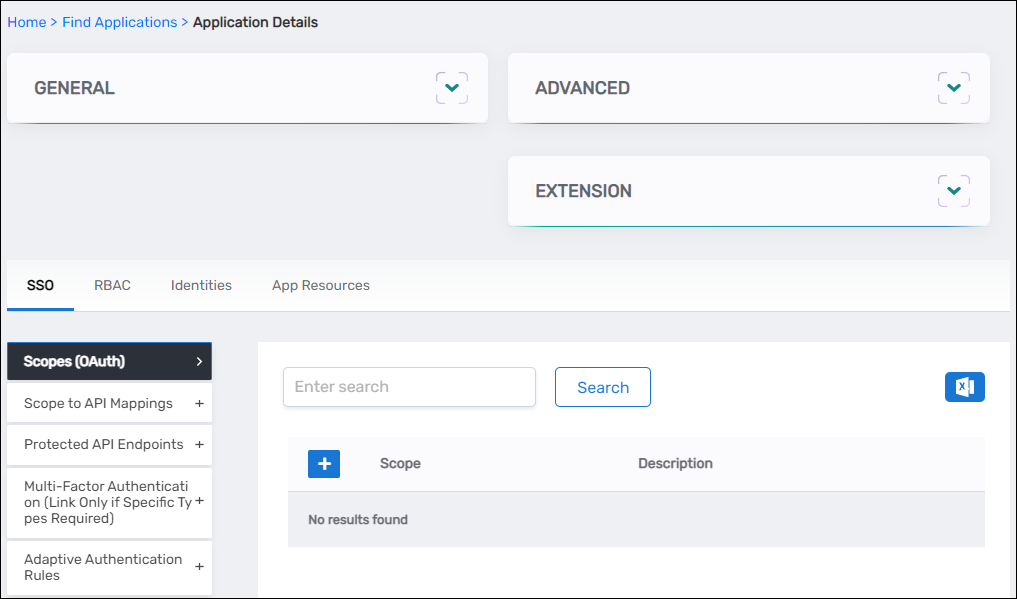
- Click the Add button on the grid header.
- Add the following scopes (replace with your own based on your API endpoints):
eidbot.computereidbot.credseidbot.otpeidbot.registrationeidbot.secrets
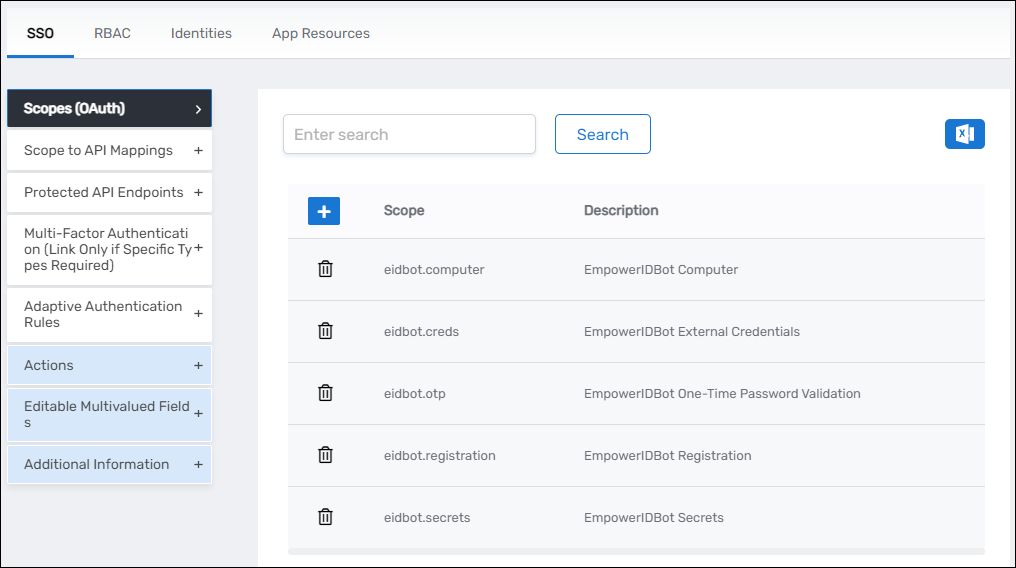
Use descriptive, hierarchical naming for scopes (e.g., application.category.action). This makes it easier to understand what access each scope grants and helps with organization as your API grows.
Map Scopes to API Endpoints
- Expand the Scope to API Mappings accordion and click the Add button in the grid header.

- In the API Info dialog that opens, do the following:
- Scope – Search for and select the desired scope
- Protected API Endpoint – Search for and select the appropriate endpoint
- Click Save

- Repeat step 2 and assign scopes to the rest of the web services you registered in Workflow Studio.
When assigning scopes, keep in mind that multiple web services can be assigned a single scope. Categorize relatable web services and assign a scope item to them. Do not create one scope item for one web service. For example, a scope named eidbot.creds can be assigned to web services performing credential actions; a scope named eidbot.management can be assigned for user management actions, etc.
Step 5: Grant Access to the Web Services
As with all resources protected by EmpowerID, API endpoints or web services are secured by the RBAC engine. This means that even users with access to an endpoint cannot call or consume it without proper RBAC delegations. To make endpoints available to your users, you need to create RBAC delegations for users who will be consuming your custom API endpoints.
Configure RBAC Delegations
- On the navbar, expand Role Management and select Manage Delegations.
- Select the Resource Delegations tab.
- Do the following in the delegations form to grant access to your endpoints:
- Resource Type – Select Web Service
- Enter a Web Service to Search – Search for and select an endpoint
- To Which Type of Actor Do You Wish to Assign Access – Select the appropriate actor type (Person, Business Role and Location, Group, Management Role, Management Role Definition, Query-Based Collection)
- Click the Add button in the grid header and then search for and select the appropriate actor. For example, if you selected Business Role and Location as the actor type, you search for the specific Business Role and Location
- Access Level – Select Executor
- Click Save
- Repeat Step 3 for each of your endpoints.
Testing OAuth Scopes
After configuring OAuth scopes for your REST API endpoints, test the implementation to ensure proper access control.
Obtain an Access Token
-
Request an access token with specific scopes using your OAuth client credentials:
curl -X POST "https://{your-empowerid-server}/oauth/token" \
  -H "Content-Type: application/x-www-form-urlencoded" \
  -d "grant_type=client_credentials" \
  -d "client_id={your-client-id}" \
  -d "client_secret={your-client-secret}" \
  -d "scope=eidbot.computer eidbot.creds"
Replace the placeholders with your actual server URL, client ID, client secret, and desired scopes.
-
Verify the returned token includes only the requested scopes.
Test API Access
-
Call an API endpoint within the granted scopes:
curl -X GET "https://{your-empowerid-server}/api/your-endpoint" \
  -H "Authorization: Bearer {your-access-token}" \
  -H "Content-Type: application/json"
Replace the placeholders with your actual server URL, endpoint path, and access token.
-
Attempt to call an API endpoint outside the granted scopes to verify access is denied with an appropriate error message.
Summary
In this tutorial, you configured OAuth scopes for REST API endpoints by:
- Creating custom REST API endpoints in Workflow Studio for your specific business requirements
- Establishing an OAuth client application with proper authentication credentials and callback URLs
- Creating a Protected Application Resource and binding it to the OAuth client application
- Defining OAuth scopes that logically group related API endpoints for access control
- Mapping scopes to API endpoints to establish the relationship between permissions and resources
- Configuring RBAC delegations to grant appropriate users access to the protected web services
- Testing the OAuth scope implementation to verify proper access control
This OAuth scope implementation provides fine-grained access control for your REST API endpoints, ensuring that applications and users can only access the specific services they are authorized to use based on the scopes granted in their access tokens.