Manage Access Assignments for Management Roles
When you need to directly assign specific resource access to a Management Role, you can add, remove, and configure access assignments on the role itself. This approach provides granular control over individual resource assignments and grants or revokes access to applications, groups, systems, or other resources for all role members.
Access Requirements: You must have appropriate permissions to manage access assignments for the specific Management Role.
Use this approach when you need to grant resource access to entire roles rather than individual users, when you need to configure time-constrained access assignments, or when you need detailed control over access assignments that isn't available through the wizard workflows.
Before You Start
You need access to the Resource Admin application to manage access assignments for Management Roles. If you can't access this function, contact your administrator to request permissions.
Make sure you have:
- Knowledge of which resources should be accessible to the Management Role members
- Understanding of any time constraints that should apply to the access
- Business justification for new access assignments
- Decisions about access levels and permissions for the assigned resources
Get Started
-
Navigate to the Resource Admin portal.
-
Select Management Roles from the resource type menu.
-
Use the search functionality to locate the Management Role you want to modify.
-
Click the Details button on the Management Role record.
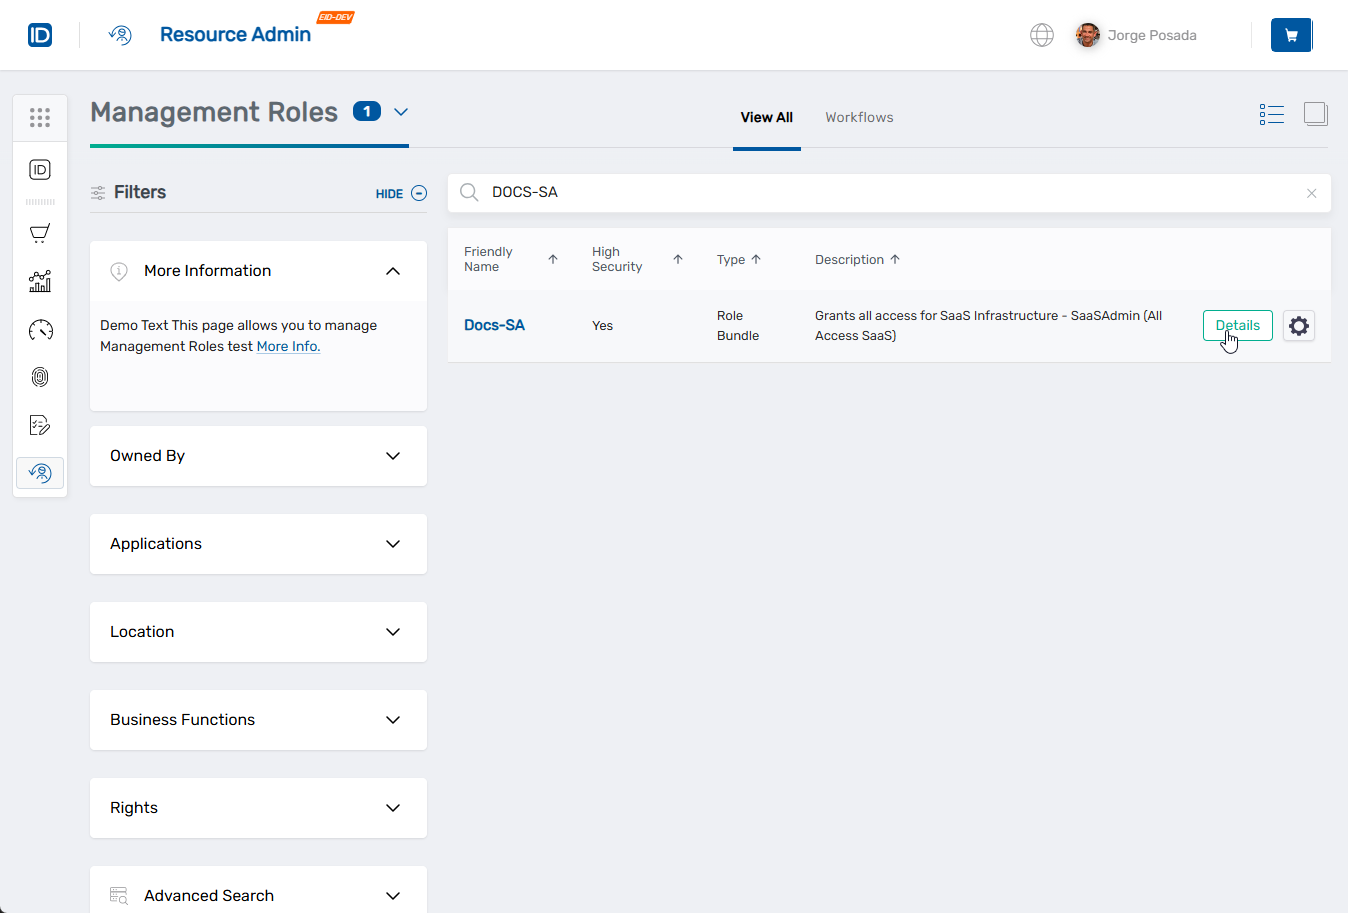
You will be directed to the Management Role Overview page.
-
From the role menu on the left, select RBAC Assignments.
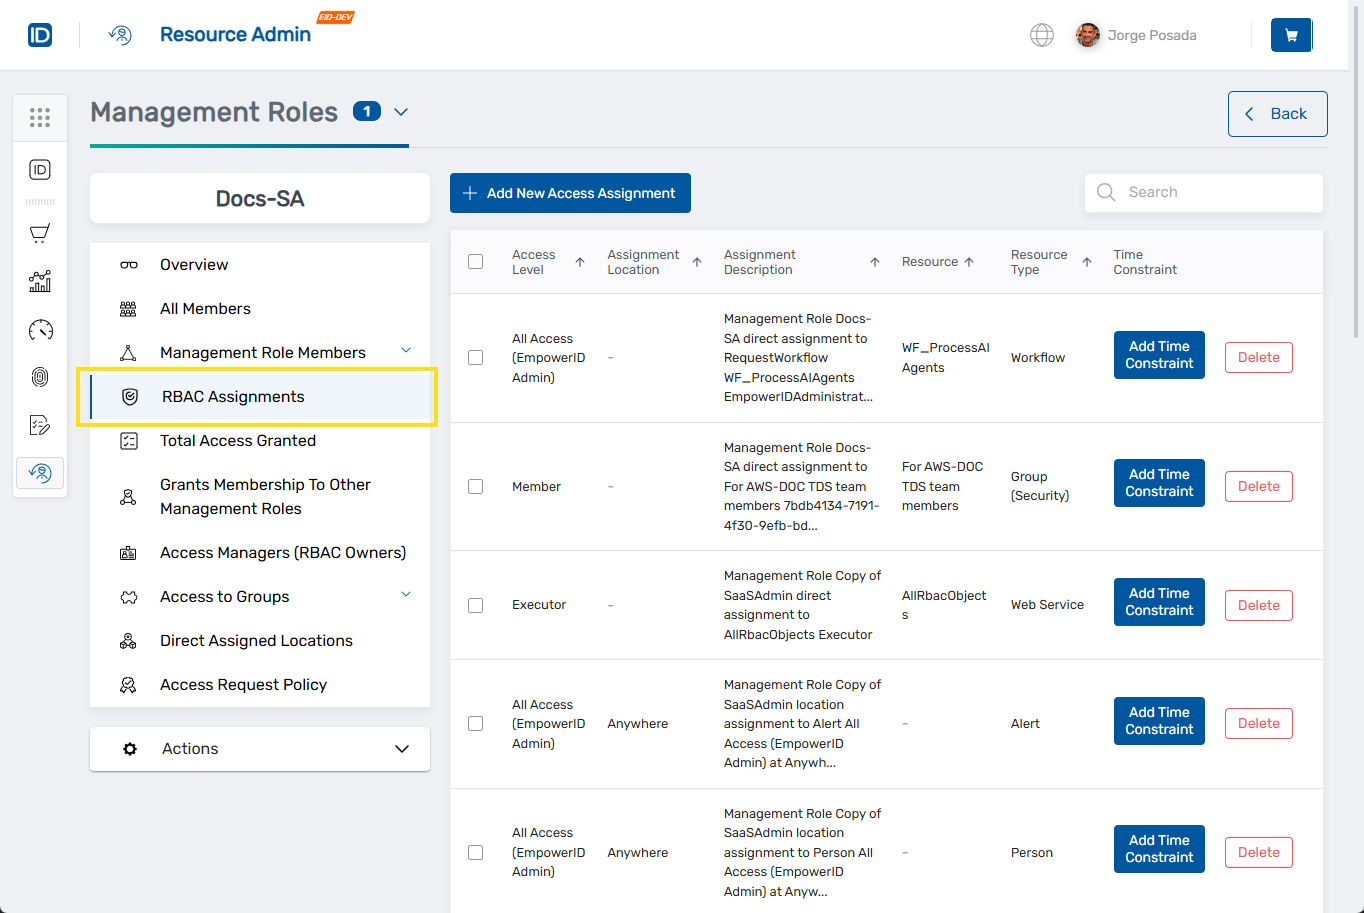
Manage Access Assignments
From the RBAC Assignments page, you can perform several management actions:
Add New Access Assignments
-
Click Add New Access Assignment to grant the role access to additional resources.
A new access assignment form opens with three main configuration sections:
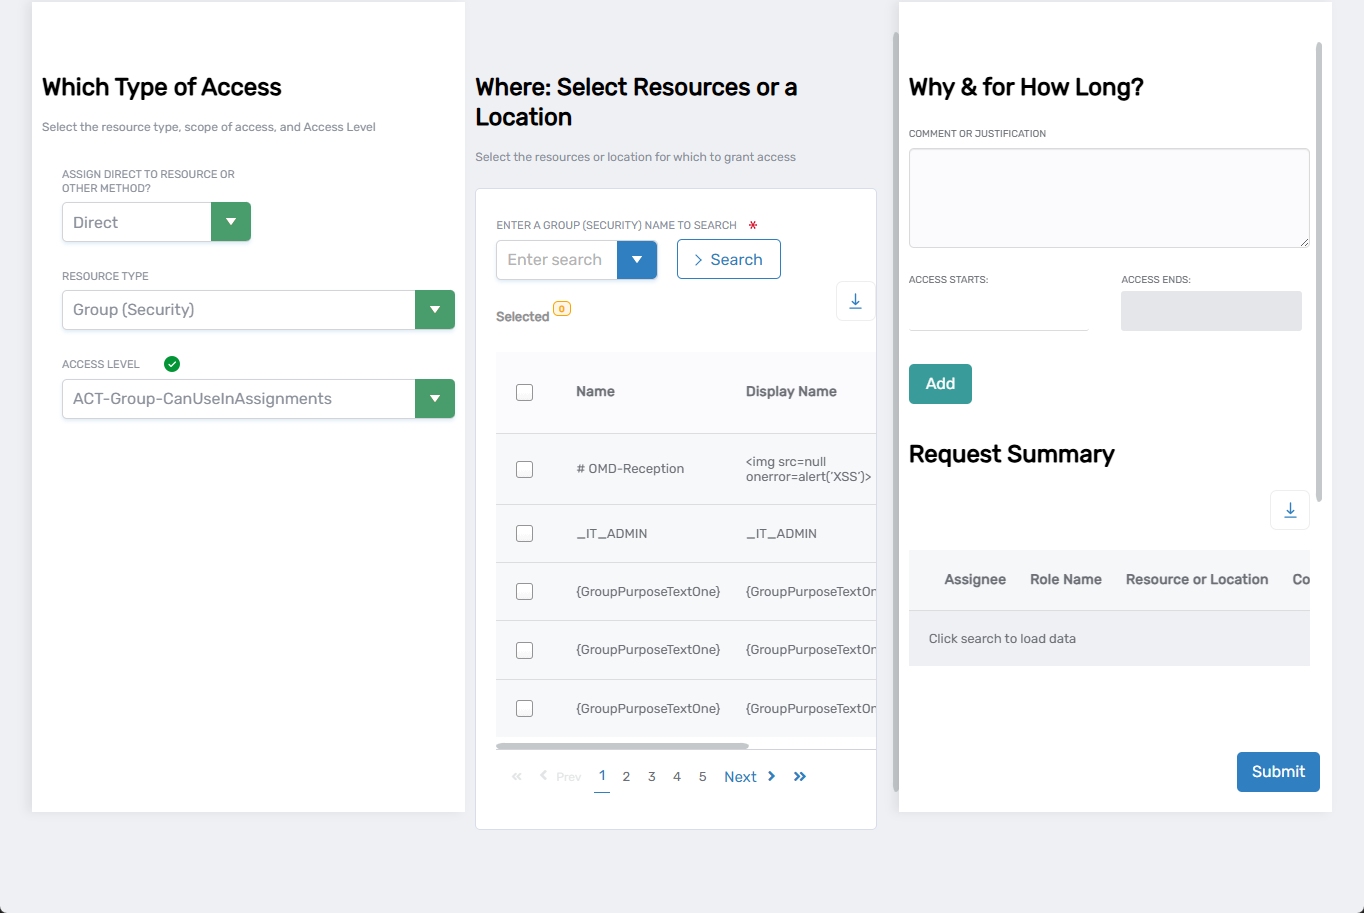
-
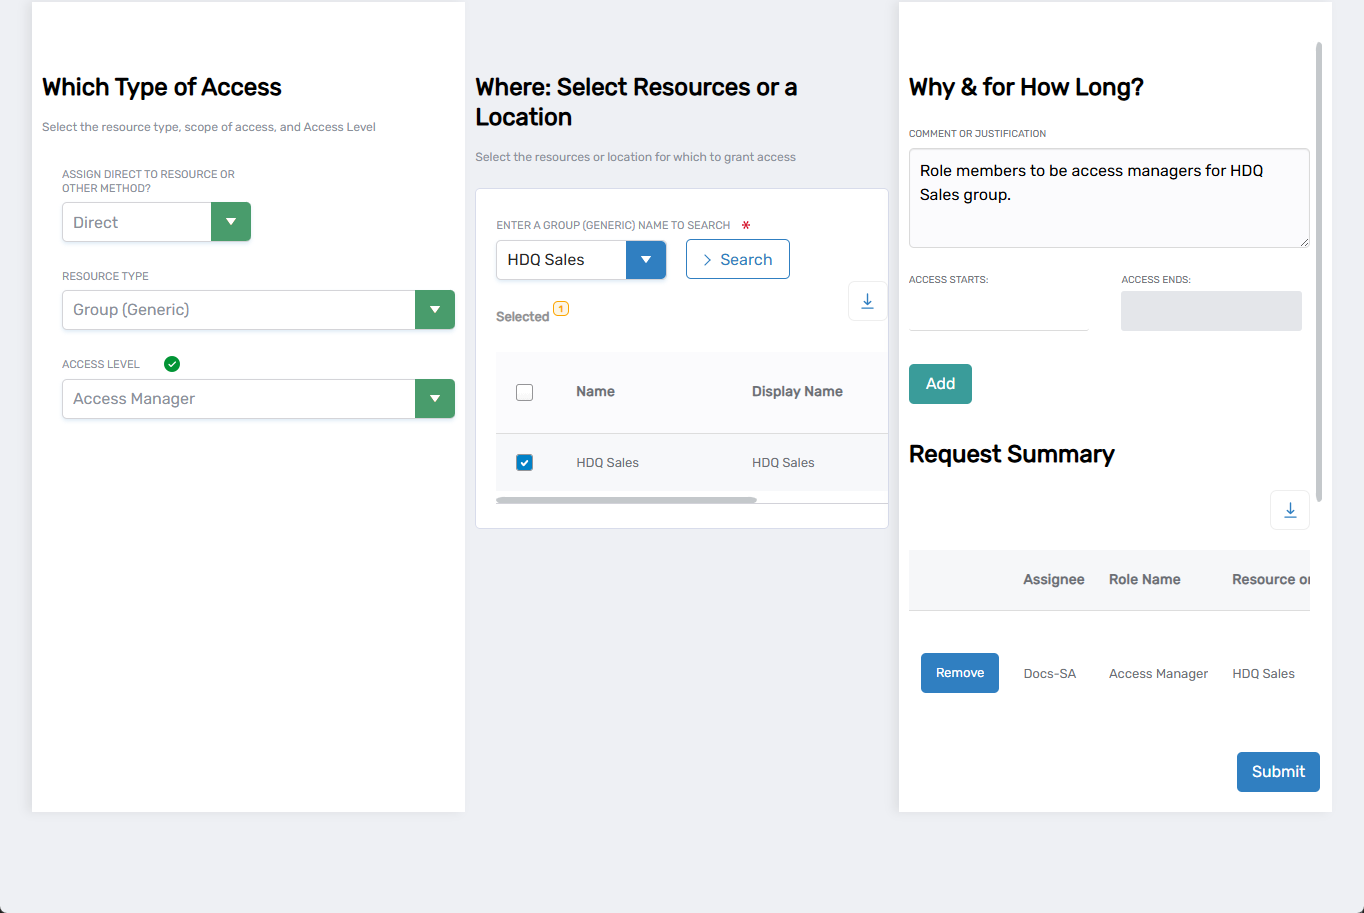
Complete the Which Type of Access section:
- Assign Direct to Resource or Other Method - Select the type of assignment:
- Direct - Assign access to a specific resource, such as a single group.
- By Location - Assign access to all resources in a specific location (and below if the location has child locations), such as all groups in Boston.
- Relative - Assign access to all resources relative to members of the Management Role, such as all groups in a person's locations.
- Belonging to which group - Assign access to all users and people who are members of the selected group(s).
- Belonging to which Management Role - Assign access to all people who are members of the selected Management Role(s).
- Belonging to which Query-Based Collection - Assign access to all objects belonging to the Query-Based Collection.
- Resource Type - Select the resource type for which you are assigning access, such as Group (Generic).
- Access Level - Select the Access Level you are assigning, such as Access Manager.
- Assign Direct to Resource or Other Method - Select the type of assignment:
-
Complete the Where: Select Resources or a Location section:
- Search for and select the target resource(s) or the target location (for By Location assignments).
- Use the search field to locate specific resources by entering their name.
- Click Search to display available resources matching your criteria.
- Review the list of resources showing Name and Display Name columns.
- Check the box next to each resource you want to assign to the Management Role.
- Use pagination controls if needed to browse through multiple pages of results.
-
Complete the Why & for How Long? section:
- Comment or Justification - Enter a comment about the assignment (optional).
- Access Starts - Click the field and select a start date and time from the calendar. If a start date is not selected, access begins immediately.
- Access Ends - Click the field and select an end date and time from the calendar. If an end date is not selected, access continues perpetually.
-
Click Add to include this assignment in your request.
The assignment will appear in the Request Summary section showing the assignee, role name, and selected resources. You can remove assignments from the summary using the Remove button if needed.
-
Repeat steps 2 through 5 for each additional assignment you want to make.
Multiple assignments will accumulate in the Request Summary, allowing you to configure several access grants in a single operation.
-
Review the Request Summary to verify all assignments are correct.
-
Click Submit to the access assignments.
Remove Existing Access Assignments
Remove Individual Assignments:
- Locate the assignment you want to remove in the assignments list.
- Click Delete to initiate the removal process.
- Review the confirmation dialog that appears explaining the impact of the deletion.
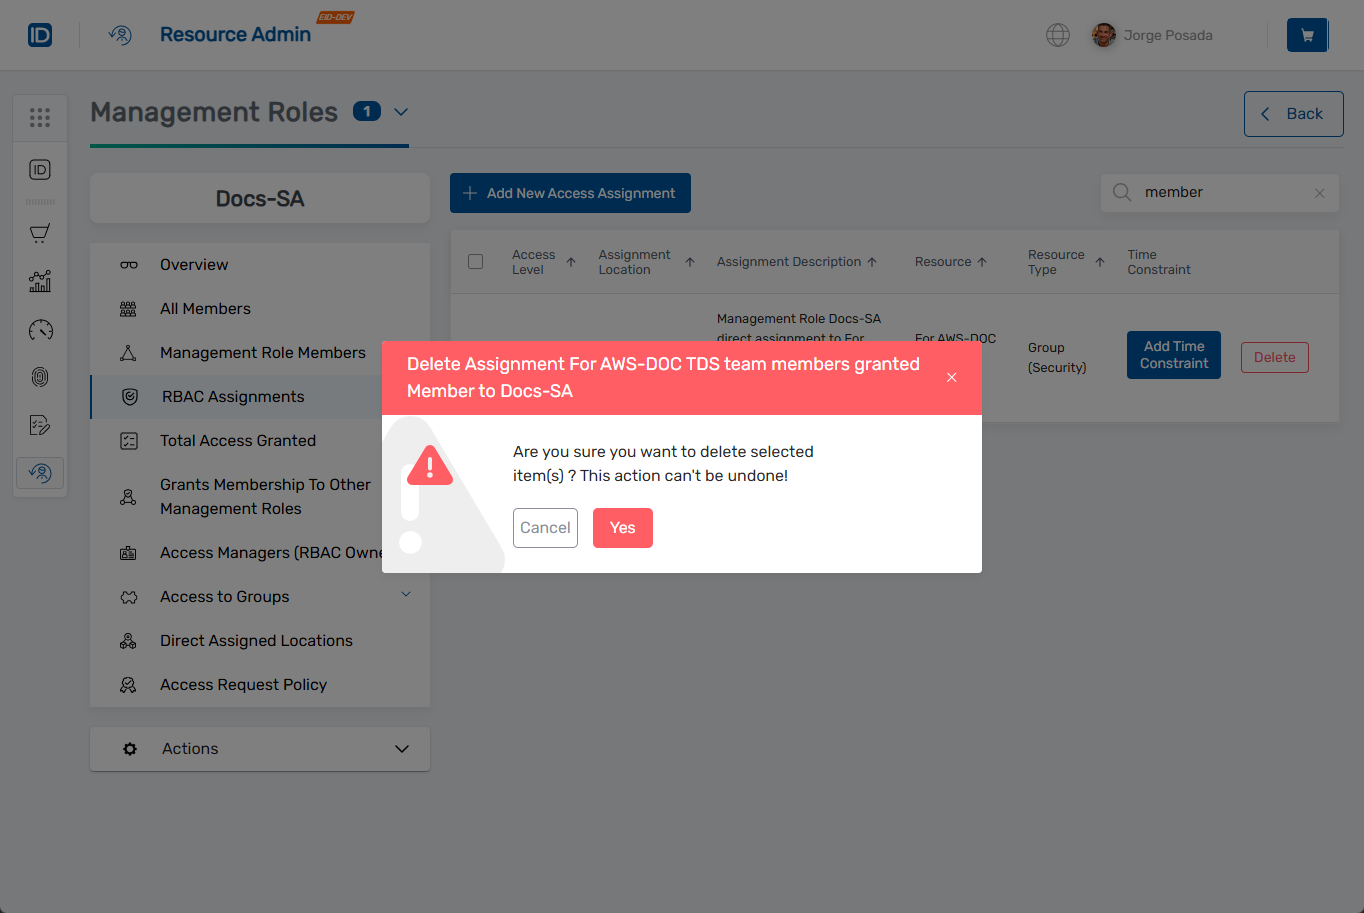
- Click Confirm to permanently remove the access assignment.
Remove Multiple Assignments:
- Check the box next to each assignment you want to remove from the assignments list.
- Click the Remove X Access Granted button that appears (where X is the number of selected assignments).
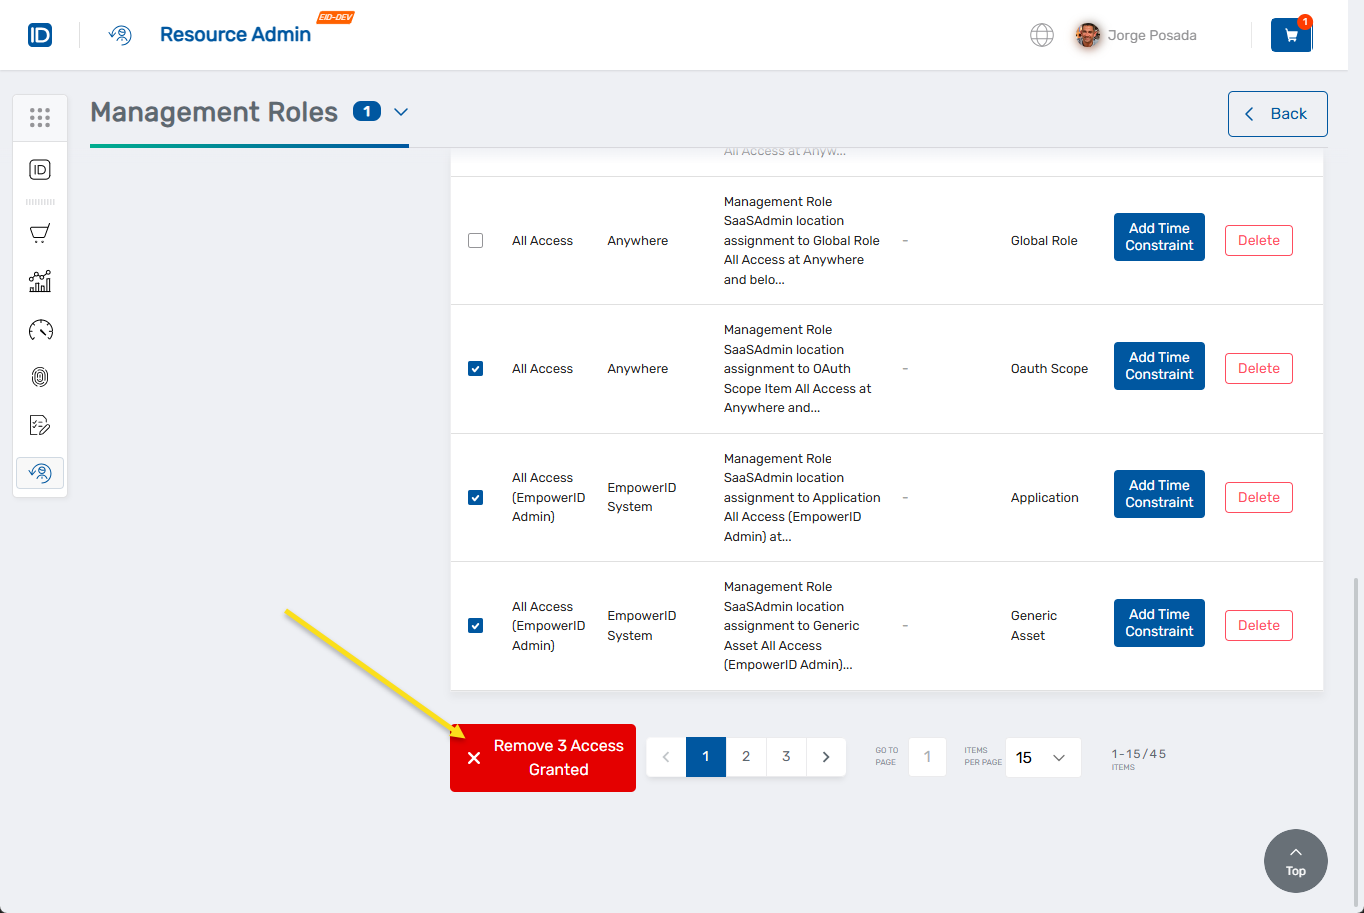
- Confirm the bulk removal when prompted.
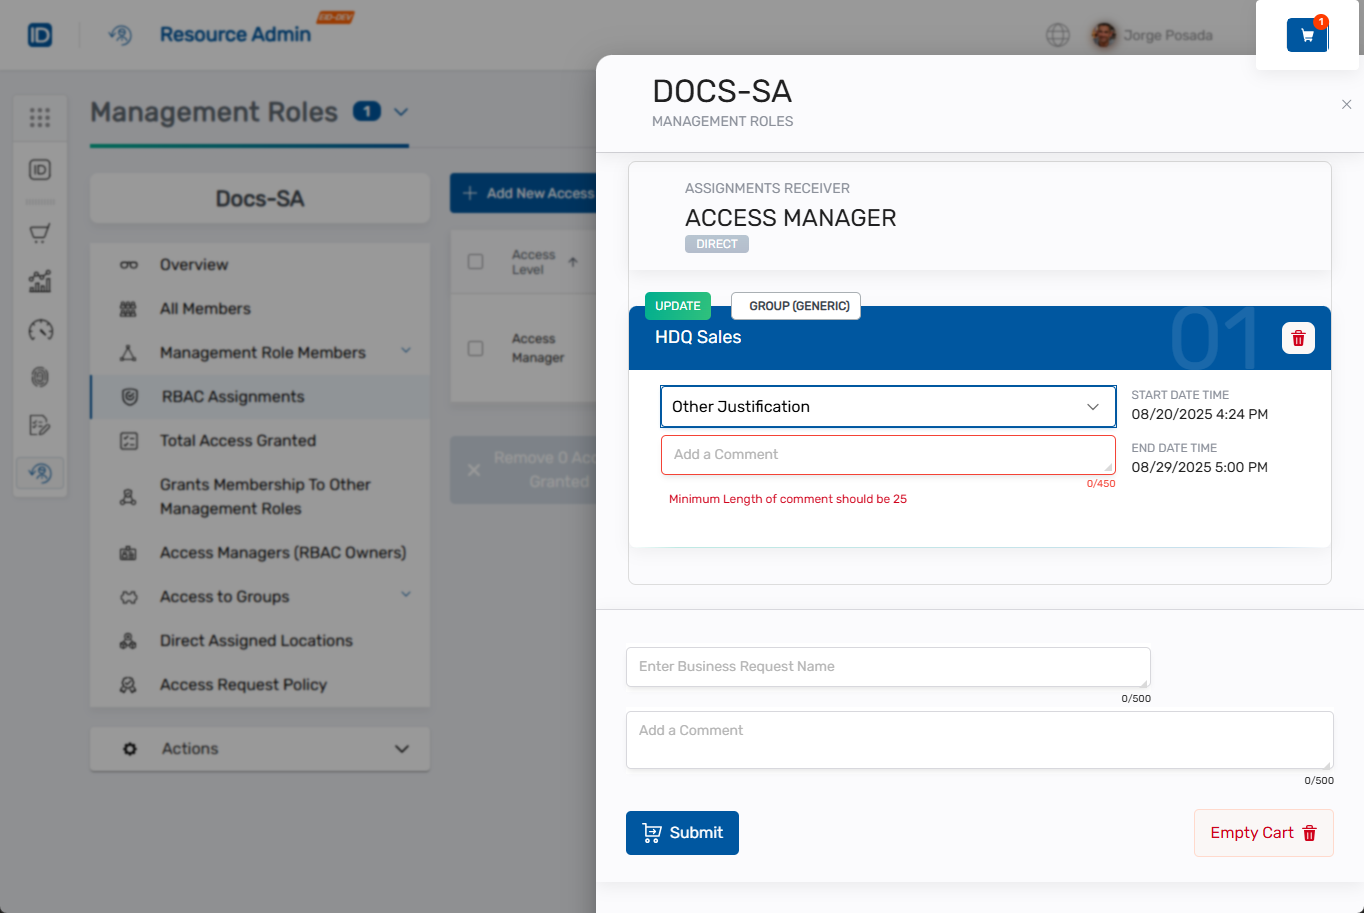
Add Time Constraints to Existing Assignments
-
Locate the assignment you want to add time constraints to in the assignments list.
-
Click Add Time Constraint to set expiration dates or time-based restrictions.
The Time Constraint dialog opens:
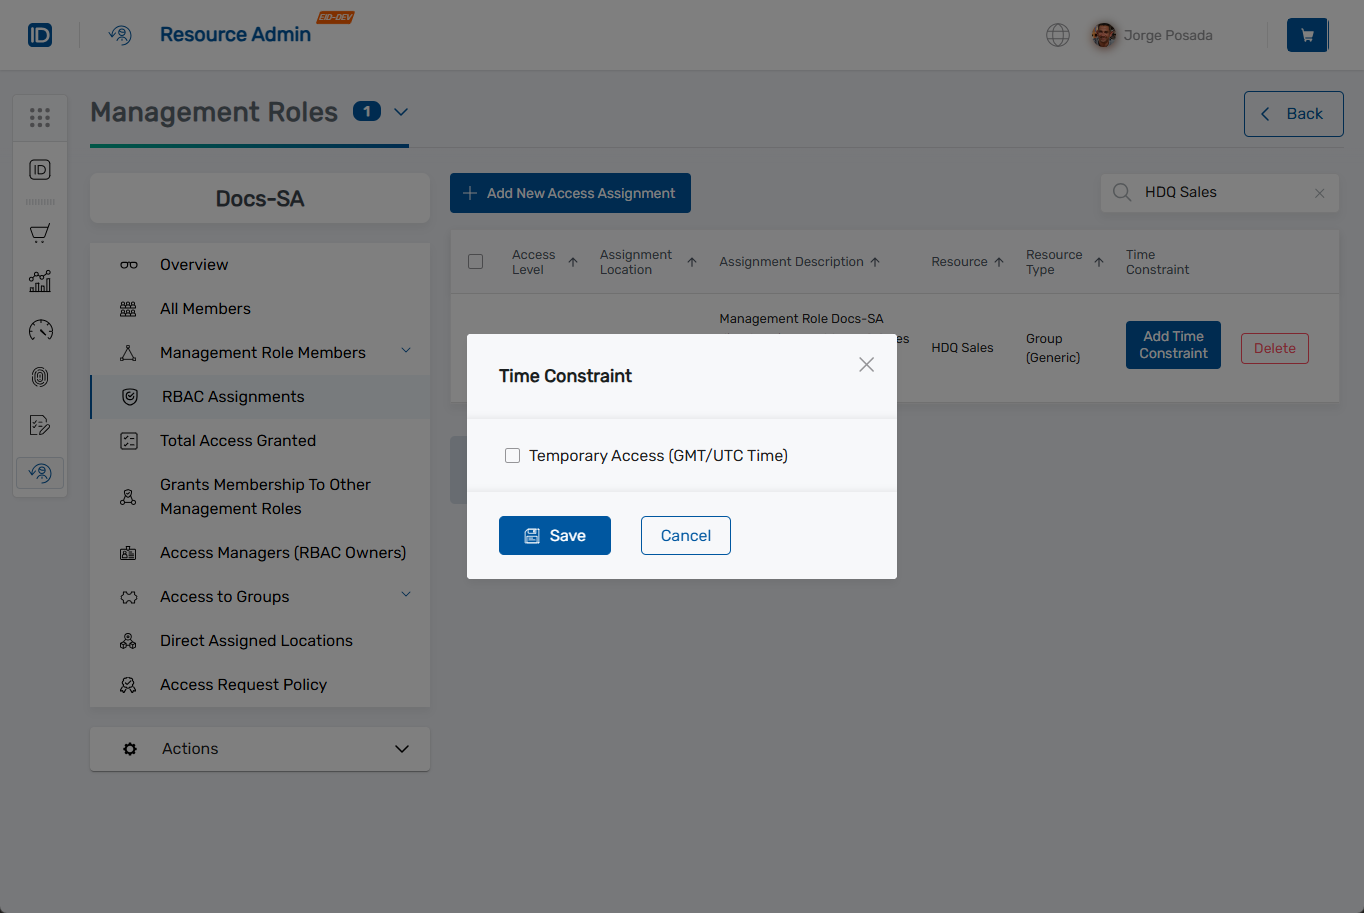
-
Configure the time constraint settings:
- Check Temporary Access (GMT/UTC Time) to enable time-based restrictions.
- Access Begins - Click in the date/time field to open the calendar picker. Select the start date and time for when access should become active.
- Access Ends - Click in the date/time field to open the calendar picker. Select the end date and time for when access should expire.
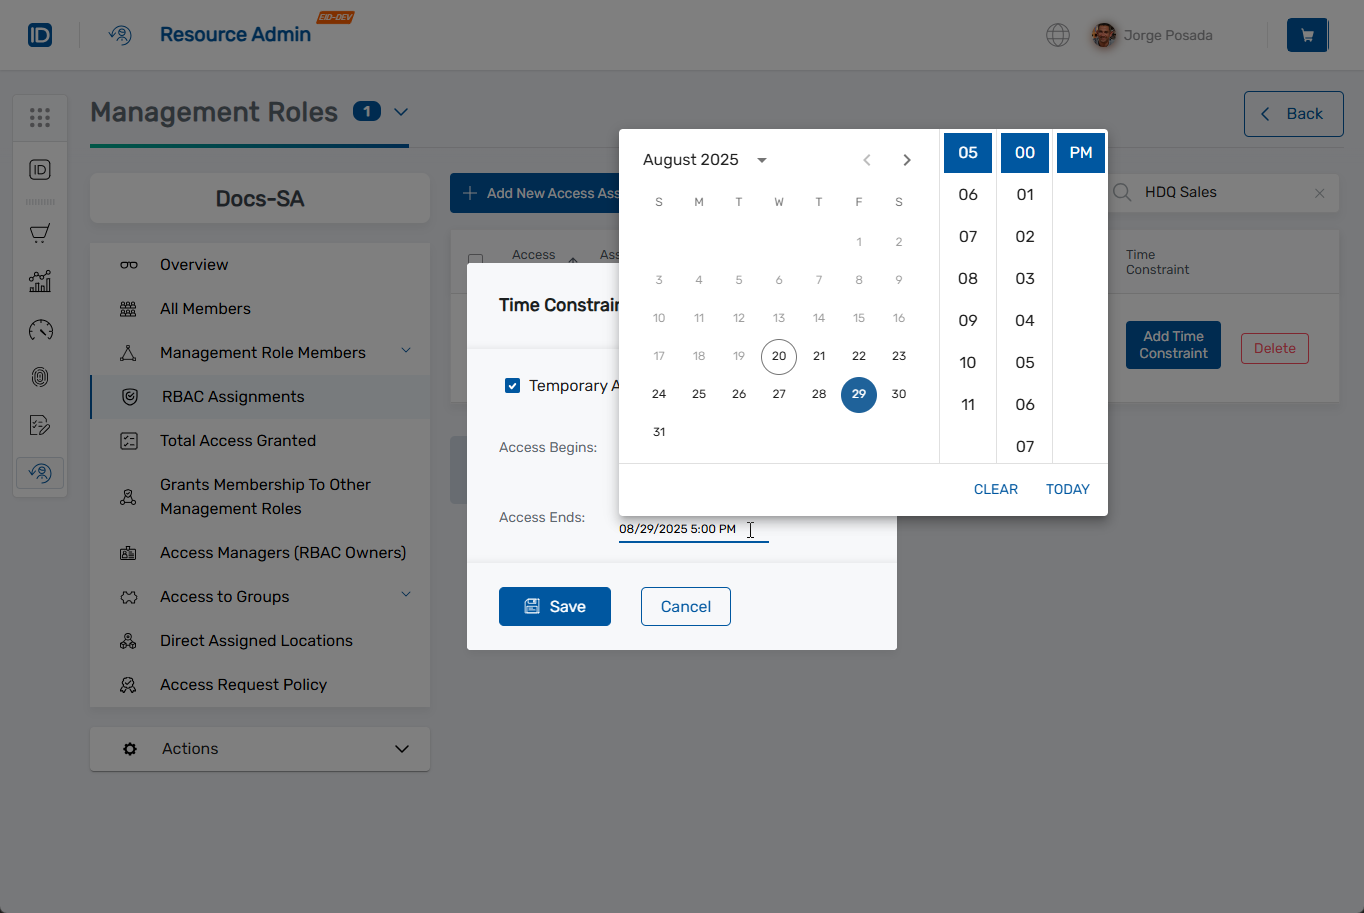
- Ensure you select a valid end date and time as indicated by the system validation.
-
Click Save to add the time constraint request to your cart.
The time constraint adjustment will be added to the Resource Admin cart (indicated by the cart icon in the top navigation).
-
Click the cart icon in the top navigation to complete the time constraint request.
-
For each time constraint adjustment in your cart:
- Select a justification from the dropdown or choose "Other Justification".
- Add a comment explaining the reason for the time constraint when choosing "Other Justification" (minimum 25 characters required).
- Enter a Business Request Name to identify this request.
-
Click Submit to finalize all time constraint adjustments in your cart.
What Happens Next
- Access assignment changes may generate business requests that require approval before taking effect.
- Once approved and applied, all members of the Management Role immediately gain or lose access to the assigned resources.
- Time-constrained assignments automatically activate and expire based on the configured schedule.
- New assignments grant role members the specified access level to the selected resources.
- Removed assignments immediately revoke access for all role members.
- Changes are reflected in audit logs and access reviews for compliance tracking.
If You Run Into Problems
Can't find the resource to assign: Verify the resource exists in the system and you have permission to assign it to Management Roles. Check that you're searching in the correct resource type category.
Time constraints not applying correctly: Ensure time constraint configuration uses the correct time zone (GMT/UTC) and that start times are before end times. Verify system time synchronization.
Assignment changes don't take effect: Access assignment changes may require approval through business request workflows. Check for pending requests in your approval queue or contact your administrator.
Related Actions
- To create new Management Roles, see Onboard Management Roles.
- To modify role bundles and nested roles, see Edit Management Role Assignments.
- To manage role ownership and governance, see Edit Management Role Owners & Deputies.